As I mentioned in my last post, I wanted to combine all the sides of each cube into one mesh so I could render the entire Descent I mine for a game level. I refactored the I created to test one cube so that I can spin through and render every cube. This turned out to be easier than I expected and this is what the level looked like:

The white dots that you see in the picture above are the vertex cubes that I left in as reference.
The next step was to exclude cube sides that were connected to other cubes. To do this, I moved my method used to add triangles to a large list of triangles, into the CubeRecord class. This class maintains the mask that tells which sides of the cube connect to other sides. Then I modified the method to exclude any triangles that were not in the mask, using logic like this:
        // left
        if ((CubeMask & CubeBitMask.SideLeft) == 0)
        {
            triangles.Add(BoxVertices[2]);
            triangles.Add(BoxVertices[6]);
            triangles.Add(BoxVertices[7]);
            triangles.Add(BoxVertices[7]);
            triangles.Add(BoxVertices[3]);
            triangles.Add(BoxVertices[2]);
        }
The trick with this logic, is that I also have to make sure that I have the correct UVL records to match. There will be four of those per side. The UVL method was written like this:
    public void AddUvs(List<Vector2> uvs)
    {
        for (var i = 0; i < 6; i++)
        {
            if (Children[i] == -1 || Sides[i].Number != -1)
            {
                // same uvs for all faces
                uvs.Add(new Vector2(0, 0));
                uvs.Add(new Vector2(1, 0));
                uvs.Add(new Vector2(1, 1));
                uvs.Add(new Vector2(0, 1));
            }
        }
    }
This is only temporary. Once I have the right textures applied, I’ll be using the actual UVL data from my HOG file reader. That means that I still need to convert from fixed point coordinates to floating point. A somewhat trivial task.
The GitHub repository for this blog post is located here.
Texture Maps
My next task is to map textures to each cube wall. I intend to map the correct texture and also make sure it is stretched correctly (using the UV coordinates). To do this in Unity, I intend to use PNG or JPG files that I can import as assets. These files will be true color, since the graphics card will be performing the actual mapping of the texture.
I started this task by writing some code to explode the entire HOG file into it’s parts. You can find this GitHub project here. You’ll need to create a C:\temp\DescentAssets directory before running this console application. The result will be a directory full of files. 159 files to be exact:

The PCX files are images of the “story” graphics. Some are used in-between levels. None of these are used by the levels (except maybe the map viewer):

The aspect ratio is wrong, which makes it look squished. I’m going to ignore that for now.
After I discovered that there were no textures in this collection of files, I started digging around the documentation on-line and quickly discovered that the texture maps are located in one of the other Descent asset files called the PIG file. Time to decode the PIG file.
The on-line documentation was spotty and it was incorrect. Fortunately, I have the source code, and I found the PIG file was read from the MAIN\PIGGY.c file. The structure that describes the information for each bit map is called “DiskBitmapHeader”. In C, it looks like this:
typedef struct DiskBitmapHeader {
	char name[8];
	ubyte dflags;
	ubyte	width;
	ubyte height;
	ubyte flags;
	ubyte avg_color;
	int offset;
} DiskBitmapHeader;
Once I was able to get the correct offsets to read texture meta data from the PIG file, I discovered that the Descent PIG file contained 1,555 textures. One anomaly that I discovered was that the PIG file contained duplicates (multiple copies) of some of the textures. I’m assuming that they were corrected and then re-appended to the file. Maybe only the last texture is used by the game?
I dug around in the descent editor and it suddenly hit me: Animations. Yup, here’s door13:
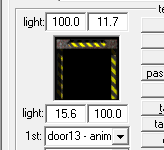
Door13 seems to have 15 frames and it animates back and forth. The DFlags byte of data contains the frame number (bits 0-5, so you’ll need to AND with 63 to get the frame number). I added this information to the texture_list.txt file and found that door13 had frame information:
 door13   (64 x 64, Frame:0)
 door13   (64 x 64, Frame:1)
 door13   (64 x 64, Frame:2)
 door13   (64 x 64, Frame:3)
 door13   (64 x 64, Frame:4)
 door13   (64 x 64, Frame:5)
 door13   (64 x 64, Frame:6)
 door13   (64 x 64, Frame:7)
 door13   (64 x 64, Frame:8)
 door13   (64 x 64, Frame:9)
 door13   (64 x 64, Frame:10)
 door13   (64 x 64, Frame:11)
 door13   (64 x 64, Frame:12)
 door13   (64 x 64, Frame:13)
 door13   (64 x 64, Frame:14)
That confirms the use of multiple texture maps stored in the PIG file.
To find the correct offset to the beginning of the texture data, I completed the code to read the sound meta data. Sound meta data is represented by the following C structure:
typedef struct DiskSoundHeader {
    char name[8];
    int length;
    int data_length;
    int offset;
} DiskSoundHeader;
Once I read all the sound meta data files (the Descent PIG file contained 98 sounds), the offset was sitting at the beginning of the texture data files. Inside the PIGGY.c is a function called piggy_bitmap_page_in(). This function will read one texture record. The first thing to notice is that the run-length encoding bit is checked inside the texture record Flag. Run-length encoding brings back so many memories. In the DOS days, a lot of pictures were stored on PCX files or Picture Exchange file. PCX files were normally run-length encoded. This is an early form of compression that basically collapsed any repeated bytes of 3 or more into two bytes. The first byte is the number of repeated bytes and the second byte is the data itself. The exact algorithm is a bit more complicated than that and I’ll have to deal with this encoding when I convert the texture data into raw bytes.
I added an RLE flag to the texture_list.txt file to see how many textures are run-length encoded and discovered that most are encoded. My next task was to find the source code that decodes the RLE format. I assumed that the bitmaps were decoded as they were loaded into memory. I soon discovered that they were just read into memory and left encoded. Descent was a game that came out when 4 megabytes (not gig!) of memory was the normal amount that people had in their PC. A high-end game machine had about 16 megabytes of memory. So the game writers had to leave their texture maps compressed.
Another thing to note is that many of the textures are not an even byte size wide or high. If you look at the names of these odd textures, you’ll notice that they are not really texture maps, but single use pictures (not to be used as a repeated pattern). I stumbled across a C function that tells me that the bitmaps that are used as textures are all 64×64:
void verify_textures()
{
    grs_bitmap * bmp;
    int i,j;
    j=0;
    for (i=0; ibm_w!=64)||(bmp->bm_h!=64)||(bmp->bm_rowsize!=64))  {
            mprintf( (1, "ERROR: Texture '%s' isn't 64x64 !\n", TmapInfo[i].filename ));
            j++;
        }
    }
    if (j) exit(1);
}
The verify_textures() code was found in the MAIN\BMREAD.c file.
I had to dig around for a while (using the Notepad++ search in file feature) to find the code that decodes RLE. It was in the 2D\RLE.c file. It was fortunate that I decided to look at the code and not just assume that the developers used the standard PCX RLE algorithm, because the decoding is a little different.
In the PCX RLE algorithm the top two bits of each byte signify if the byte is a color index or a run-length number. If both bits are set, then it is a run-length number. In the case of Descent, it appears that they changed this to be all three top bits set to 1. That will reduce the run length to 31 repeats instead of 63. Here’s a diagram to show an RLE of 3 repeats:

The next byte in the sequence is the color index to be repeated. If the upper three bits are not set, then the byte is treated as the color index itself with no repeat.
The RLE data starts with an integer (4 bytes) that tells the length of the raw data to decode. After that is data that is a list of line sizes. This data is not part of the texture, so it must be skipped over (even if you don’t use it). You need to check the BM_FLAG_RLE_BIG flag (bit 6). If this flag is set, then the list of line sizes is composed of 16 bit numbers (2 bytes each). If the flag is not set, then they are 8 bit numbers (1 byte each). Once you skip over this data, then the first byte is the first pixel of your bitmap. Make sure you read up to the size of the bitmap minus 5. The raw data ends 5 bytes less than the size (I’m not sure why).
At this point, I wrote some code to convert the byte array data into bitmaps and dump them to the hard drive. I didn’t have the colors mapped, I just pretended like the index data was the colors and ran the code. This is some of what I got:

The images I printed were only of sequence 0 because the file names would be the same for each animated frame. I’ll have to put extra logic in later to dump each frame of the animations. For now, I wanted to compare with a known image to make sure I was decoding the textures correctly. So I dug up door13 and compared it:

So far, so good.
Color Palette
My next task was to read the color palette and decode the indexes of each texture into true color. The palette data is in the HOG file. When I dumped each file inside the HOG file, there were two files with an extension of 256. These are palettes. The obvious palette is the one named palette.256 and not the credits.256. The documentation indicates that there are 768 bytes at the beginning of the file with the palette data. There are two tricks to the palette data. Trick number one is that the colors are arranged blue then green then red. I discovered this when all the colors of the images were wrong. The second trick is that the colors are 4 times dimmer than the actual colors. So you need to multiple each RGB value with 4. Otherwise, you’ll be looking at a very dark scene. Here are the results of replacing the bitmap data with 3 bytes per pixel (translated from the palette) and then written as a 24 bit true color bitmap image:

There are still some issues with some of the images. Like this one:

I’m assuming that there is a flag that I missed and this image (as well as others that are torn like this) is stored in a different format. I’m going to let that go for now. I also altered the bitmap writing code to write the images out as PNG. I’m getting closer to the point where I can include the files into my Unity project and start mapping textures to the walls of my mine.
Finally, Here’s a map of the data in the PIG file:

Where to Get The Code
To get the HOG and PIG file reader, click here. For the Unity project assets, click here.
2 thoughts on “Learning Unity (Part 2)”